Today on Blogging with Labradors, I am delighted to welcome back Jacqueline Reiter with a guest post on the Walcheren campaign of 1809. Jacqueline is a historian and the author of a biography entitled The Late Lord: the life of John Pitt, 2nd Earl of Chatham and also a novel called Earl of Shadows which covers Chatham’s life up to the death of his brother, William Pitt, in 1806.
Jacqueline is currently researching the life of Sir Home Riggs Popham, the controversial navy officer who plays a key role in both An Unwilling Alliance and This Blighted Expedition.
This Blighted Expedition follows the story of the navy, the army and the local population during the Walcheren campaign of 1809 and in this post, Jacqueline explains the background to one of Britain’s greatest military disasters.
Walcheren 1809: A ‘Blighted Expedition’
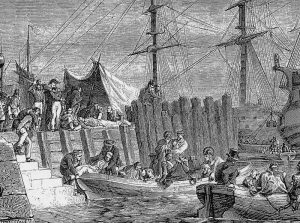
The expedition to Walcheren in 1809 overshadowed all Britain’s prior wartime preparations, including those for the Peninsula. Consisting of 40,000 men and over 600 ships, ‘it was incomparably the greatest armament that had ever left the shores of England’. [1] It was also one of Britain’s greatest military disasters. Within six weeks of leaving the shores of Great Britain, more than one in four soldiers were ill. At least one in ten died.
Why Walcheren?
The campaign represented Britain’s commitment to an alliance with Austria as part of the War of the Fifth Coalition. Austria received £2 million and a subsidy of £400,000 a month to fight Napoleon in central Europe, and the British government pledged to provide a military diversion in a sphere of their own choosing.
The plan was to capture the island of Walcheren in the Kingdom of Holland – currently a French satellite state ruled by Napoleon’s brother Louis – and destroy the French fleet and dockyards at Flushing and Antwerp. Antwerp was the second largest French naval base after Toulon, and the British had been receiving reports for some time that the French had a fleet of men of war fitting out there. One of Britain’s worst nightmares was that Napoleon would rebuild the fleet he had lost after the battle of Trafalgar and invade Britain (or worse, Ireland).
The attack on Walcheren and Antwerp was not intended to lead to any long-term continental military commitment. It was effectively a raid – in the words of Lord Castlereagh, the Secretary of State for War, ‘a Coup de Main.’ [2] Speed and near-perfect military and naval cooperation would be crucial to get an enormous army and huge numbers of ships down the complicated navigation of the Scheldt River (and bring them back again)
An unfortunate choice of commanders
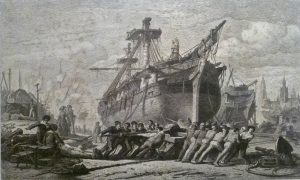
For the military command, Lord Castlereagh chose Lieutenant General John Pitt, 2nd Earl of Chatham. Chatham was more a politician than a soldier; there were rumours that he had only been appointed because he was close to King George III. This was probably untrue, but Chatham was almost totally inexperienced and notoriously lazy. His nickname was ‘the late Lord Chatham’, because he nearly always was.
The naval command went to Rear Admiral Sir Richard Strachan. Strachan’s most famous exploit was off Cape Ortegal when he captured several French vessels that had escaped after Trafalgar, but he had never participated in an amphibious operation. ‘Mad Dick’, as he was known, was impatient, impulsive, and difficult to work with.
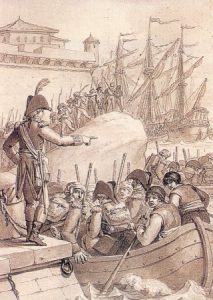
The expedition sails (… eventually)
The plan had been for the expedition to leave before the end of June, but preparations were not complete until mid-July, and contrary winds delayed the departure still further. At this point, bad news arrived: on 6 July, Napoleon had defeated the Austrians at Wagram. This tremendous blow removed one of the main strategic reasons for the expedition, but it was not called off on the grounds that victory might keep Britain’s only ally in the war.
The expedition finally sailed on 28 July and immediately ran into trouble. The fleet reached the Stone Deep off Walcheren as intended, but a gale blew up, dismasting two ships and running a third aground. This led to a significant change of plan.

The Scheldt River basin was divided into the East and West Scheldt by Walcheren and the nearby island of South Beveland. Only half the fleet should have entered the East Scheldt to land 12,000 men on Walcheren and 8,000 men on South Beveland. The other half of the fleet should have waited for the narrow channel into the West Scheldt to be secured, then carried the remaining 20,000 men directly to the designated landing place at Sandvliet.
The 29 July storm, however, forced almost all the fleet to enter the East Scheldt and shelter in a protected anchorage known as the Roompot. This meant the army now had to wait for the fleet to dash past Flushing into the West Scheldt, or funnel the siege resources for Antwerp through the Sloe Passage (the narrow channel between Walcheren and South Beveland). Both options would be difficult and potentially time-consuming.
Keep calm and carry on
For now, the British landed at Breezand on Walcheren and Welmedinge on South Beveland and initially made rapid progress. By 3 August, South Beveland and almost all Walcheren was in British hands, and the army laid siege to Flushing.
At this point, however, the expedition became bogged down. An intended landing to disable the French battery at Cadzand failed. With both Cadzand and Flushing in French hands, the fleet could not easily enter the West Scheldt to carry Chatham’s army and siege equipment to Sandvliet. Worse, Strachan was struggling against contrary winds and could not blockade Flushing from the sea until 8 August. The same winds helped hundreds of French troops sail into Flushing every day.
The bombardment of Flushing
Flushing now had to fall, and fast, so the British decided to attack Flushing the same way they had assaulted Copenhagen in 1807: by bombardment. But constructing the batteries was delayed by the dreadful weather, by lack of leadership among the engineers, and by the enemy, who cut the dykes on 10 August to flood the British lines.
The batteries finally opened on 13 August at 1 pm. Five of the six British batteries (the sixth was not fully ready until the following day) poured fire on the town from 52 pieces of ordnance. The bombardment was supported by several gunboats from the sea and, on 14 August, by seven ships of the line that Strachan had daringly brought through the channel between Flushing and Cadzand.

The bombardment went on almost continuously for 36 hours. By 2:30 am on the 15th, however, the French could clearly resist no longer. They surrendered unconditionally, and at 3:30 am the land batteries and men of war fell silent.
Flushing’s garrison of 5,000–6,000 men went to Britain as prisoners of war, and the British finally entered the ruined town. Even seasoned campaigners were horrified at the destruction that had taken place: ‘I beheld the most deplorable picture that can be conceived. Scarcely one single house in it, that has not received some shots, but the greater part of them … altogether destroyed. Many houses are burnt to the ground, and among them is the handsome stadthuis, and one large church. A more complete ruin cannot be fancied. [3]
On to Antwerp! (… or maybe not)
The first stage of British operations was now complete. The second stage – Antwerp – was still to come. Chatham, however, took his time. He did not set out until 21 August on a stately three-day journey to Fort Batz, the southernmost point on South Beveland, preceded ‘by a column of eight waggons, in the first of which was a live turtle.’ [4] (Chatham’s fondness for turtle soup, combined with his habit of sleeping in till past noon, earned him the sobriquet ‘Turtle Chatham’.)
Chatham’s lack of hurry also mystified the French, who nicknamed him ‘MilordJ’Attends’ (‘My Lord I-Am-Waiting’), [5] but Chatham probably considered Antwerp out of reach: 30,000 French troops were in the area, 11,000 in Antwerp alone, under the command of Marshal Bernadotte.
In any case, Chatham had other things on his mind. ‘Walcheren fever’ – probably a combination of malaria, typhoid, typhus, and dysentery – had struck.
Walcheren fever
The fever was sudden, sharp, and devastating, and by the time Chatham reached Fort Batz, it was spreading at a terrifying rate. Of 37,727 men, 2,702 were in hospital, and 14 had already died. By 3 September, only 11 days after first records of the epidemic, 8,194 men were sick – nearly a quarter of the whole army. [6]
On 26 August, Chatham called a meeting of his lieutenants general to discuss proceeding to Antwerp. The next day, the generals submitted their unanimous recommendation: with so many sick and so many French reinforcements round Antwerp, the only viable option was to suspend the campaign.
The British now began a hellish retreat to Walcheren. Sick men were left lying on the ground without shelter for as long as two hours because the available spaces on the transports were soon outstripped by the spread of disease. The doctors themselves were also falling ill, and medical supplies – particularly bark (quinine) – were running low.
By 4 September, the British had fully evacuated South Beveland. The next day, the French took possession of the island again.
Things fall apart
On 7 September, Chatham was recalled – but ordered to hold onto Walcheren at all costs, as the government hoped to use the island as a military base. By now there were nearly 11,000 sick, close to a third of the entire army. Chatham sailed home on 14 September, leaving a garrison of 16,000 men under Lieutenant General Sir Eyre Coote.
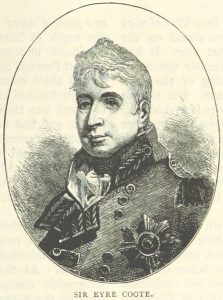
Coote was (to put it mildly) not happy. On 23 September, with more than 9,000 men in hospital and 300 new cases of sickness a day, Coote wrote home: ‘The alarming progress hourly made by this fatal disease, is such that if it should continue in the same proportion for three weeks longer … our possession of this island must become very precarious … [as] it is scarcely to be supposed that he [Napoleon] will lose so favourable an opportunity of attacking.’ [7]
Miraculously, the French held back, but the British government was in no state to make quick decisions. The Walcheren failure had blown the cabinet spectacularly apart; Lord Castlereagh even fought a duel with Foreign Secretary George Canning. When the government finally turned its thoughts to the Scheldt at the end of October, it decided nothing more could be done and sent Lieutenant General George Don to evacuate what was left of the army.
After destroying the dockyards at Flushing, the last British troops left Walcheren on 23 December. Four days later the island was again in French hands.
Walcheren’s long shadow
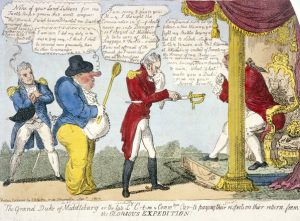
The campaign left a bitter legacy. Parliament held an inquiry into the disaster in 1810. Chatham did not help his cause by submitting a narrative to the King exculpating himself and blaming all delays on Strachan and the navy; his reputation was destroyed and he was forced to resign his government post. Strachan got off more lightly, but neither he nor Chatham was actively employed again.
Despite this, the inquiry was something of a whitewash. The government’s decision to keep Walcheren until December was even approved by a parliamentary majority.
The real victims were the sick. By February 1810, nearly 4,000 men were already dead of Walcheren fever. The final number of dead was probably closer to 8,000. [8] Of the survivors, many never fully recovered. In 1812, Wellington complained that many units under his command in the Peninsula had been ‘so much shaken by Walcheren’ that they were near-useless. [9] As late as 1824, a doctor commented on a regiment that had served at Walcheren: ‘So many years afterwards, the disease is even at this period occasioned by relapses.’ [10]
Further Reading
Gordon Bond, The Grand Expedition (Athens, GA, 1971)
Martin R. Howard, Walcheren 1809 (Barnsley, 2011)
Jacqueline Reiter, The Late Lord: The Life of John Pitt, 2nd Earl of Chatham (Barnsley, 2017)
Notes
[1] Sir John Fortescue, History of the British Army (London, 1899–1930), vol. VII, p. 56.
[2] Lord Castlereagh to Lord Chatham, July 1809, Correspondence, despatches, and other papers of Viscount Castlereagh… (London: William Shoberl, 1851), vol. 6, p. 292.
[3] Jacqueline Reiter, ‘“Day after day adds to our miseries”: the private diary of a staff officer on the Walcheren Expedition, 1809, Part 2’, Journal of the Society for Army Historical Research 96 (2019), pp. 231–250, p. 239.
[4] Diary of Sir Frederick Trench, National Army Museum 1968-07-261, ff. 65–66.
[5] Théo Fleischman, L’Éxpédition Anglaise sur le continent en 1809 (Mouscron, 1973), p. 70 n. 7.
[6] Journal of the Proceedings of the Army under the Command of Lieutenant General the Earl of Chatham, The National Archives, WO 190.
[7] Sir Eyre Coote to Lord Castlereagh, 23 September 1809, A Collection of Papers relating to the expedition to the Scheldt presented to Parliament in 1810 (London, 1811), pp. 147–149.
[8] Martin R. Howard, Walcheren 1809 (Barnsley, 2011), p. 201.
[9 ]Quoted in Howard, Walcheren 1809, p. 215.
[10] House of Commons, Report from the Select Committee on the Penitentiary at Milbank (London, 1824), p. 74.
 This Blighted Expedition (The Manxman Book 2) is due to be published on 31st October 2019 and is currently available for pre-order on Amazon.
 An Unwilling Alliance (The Manxman Book 1) has been shortlisted for the Society for Army Historical Research Fiction Prize and is available on Kindle and paperback from Amazon.